What’s new
In Version 1.4
See the changelog for version 1.4 for a complete list of changes.
DXF export
Export closed paths in the current group as a DXF file for use in other applications, such as for exporting PCB outlines to Horizon EDA.
Where to find it: In the spacebar menu, search for “Export DXF from current group”. Note that the current groups needs to have an active workplane.
More versatile arrays
Array and mirror groups now support multiple source groups, making it easier to reuse groups in more complicated models.
Where to find it: In an array/mirror group, set the sources to “Body up to group” / “Group range”.
Same curvature constraints
Use the same curvature constraint on two bezier curves or an arc and a bezier curve to join them with G2 continuity for super-smooth corners.
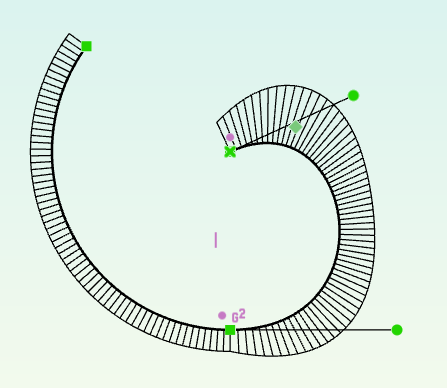
Where to find it: Select a point joining two bezier curves or an arc and a bezier curve, and select “Constrain same curvature” from the context menu. You can also convert tangency constraints to same curvature constraints from the context menu.
Improved STEP export
The new “Export STEP (all)” action exports all bodies to a STEP file. Also, all STEP exports now preserve body names and colors.
Where to find it: In the spacebar menu, search for “Export STEP (all)”.
Navigation cube
The new navigation cube replaces the axes lollipop to see which way’s up. Compared to what was there before, it’s interactive and clicking on a face aligns the camera to it.
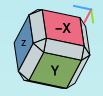
Where to find it: Top-right corner of the viewport.
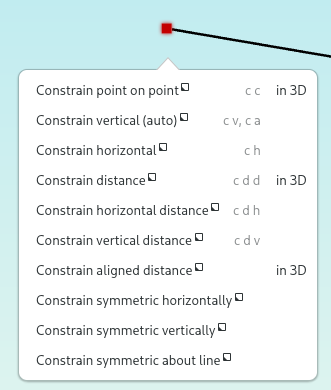
Improved constraining workflow
When creating a constraint with a datum such as distance, you can enter and place the datum in the constraining tool so the newly-created constraint is as you want it right away.
Constraints that apply in 3D rather than in a workplane can now be created directly from the context/constraining menu without turning off the active workplane.
In Version 1.3
See the changelog for version 1.3 for a complete list of changes.
Picture import
Import photos or scans to reference in a sketch. By placing anchors, you can precisely scale the imported picture or reference specific points in constraints.

Where to find it: In a sketch group with an active workplane, search for “Import picture” in the spacebar menu.
Constraint preview
Hover over constraints in the context or new constrain menu and get an instant preview of what the constraint will do to your sketch once it’s applied.
Where to find it: Open the new constrain menu by pressing z or right-click.
Pipe groups
With pipe groups, you can extrude a sketch along a path.

Where to find it: Click the plus button below the groups list and select “Pipe”.
Curvature combs
Enable curvature combs to tweak bezier curves for super-smooth corners.

Where to find it: In the view options menu in the status bar, increase the curvature comb scale.
Mirror groups
Use mirror groups to quickly create symmetric objects.

Where to find it: Click the plus button below the groups list and select “Mirror horizontally” or “Mirror vertically”.
In Version 1.2
See the changelog for version 1.2 for a complete list of changes.
Warning
Chamfers and Fillets created with version 1.1 or earlier (this commit to be precise) may appear on the wrong edge starting with in this version.
Copy / Paste
Use copy/paste to reuse sketches, even across multiple documents.
Where to find it: The usual Ctrl-C/X/V shortcuts. See Copy / Paste for more information.
Bezier curves
Easily draw pretty curves using cubic beziers. Constraints for smooth or symmetric tangents and point-on-bezier are available as well.

Where to find it: In the “Draw Contour” tool, press b to switch to bezier mode or use the “Draw bezier curve in workplane” tool.
Body colors
Don’t get lost in complex documents by coloring bodies.

Where to find it: Right-click on a body in the workspace browser and select “Set color”.
Text entities
Add high-quality text to your parts with support for OpenType features such as ligatures or tabular figures.

Where to find it: “Draw Text” tool or the “ABC” button in the action bar.
DXF import and cluster entities
Quickly get existing geometry into Dune 3D by importing DXF files. Use Cluster Entities to scale and rotate an imported DXF file as a single entity. This is especially useful for logos and such.

Where to find it: “Import DXF” tool, “Create cluster” tool. See Cluster entities for more information.
Loft groups
Create tapered non-circular solids that’d be difficult to generate otherwise using loft groups.

Where to find it: In the create group menu (plus icon below the list of groups), select “Loft”.
Revolve groups
In addition to lathe groups that do full 360° rotational sweeps, there now are revolve groups that do circular sweeps over a variable angle.

Where to find it: In the create group menu (plus icon below the list of groups), select “Revolve”.
Measurements
All distance and angular constraints can also be used for measurements.

Where to find it: In the context menu, look for the measurement tools.
Workspace views
Use Workspace views to quickly switch between different views of all open documents.
Where to find it: Tab bar at the bottom of the window, click the plus button on the right edge to add a new workspace view.
Tooltips
Know what you’re looking at with handy tooltips.

Where to find it: Keep to mouse cursor over items for a short while.
Improved selection
When selecting overlapping entities, there now is a menu to select a specific entity.

Where to find it: Click three times on the overlapping entities or hold Shift to show the menu right away.
STEP models as wireframe
Imported STEP models can now be displayed as a wireframe or hidden to reduce clutter or move anchors that fell inside of the solid:

Where to find it: In the “Selection” tab after selecting the STEP model.
In Version 1.1
See the changelog for version 1.1 for a complete list of changes.